


Wednesday, 30 May 2007
Tweaking color curves with GIMP
I've mentioned the GIMP image editing program before, and why you might want to acquire a copy. Below, an explanation of how to use it to quickly turn this:

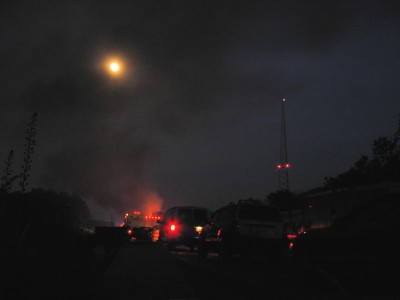
into this:
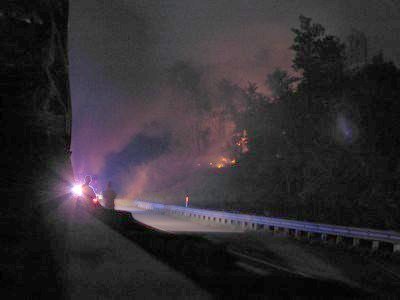
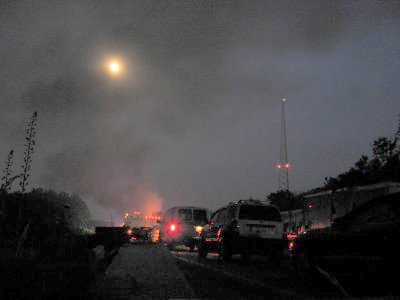
Last night Brendan Loy posted (via wireless connection, no less) some dramatic photos taken at an accident scene on I-40 between Nashville and Knoxville, Tennessee. His first picture was taken shortly after 9 p.m. (just after sunset). I've borrowed a couple for this demonstration, but go look at the others.
I'd never been much of a picture taker, and didn't get around to buying my first digital camera (a $100-special Polaroid) until a couple of years ago. Like many before me, I've discovered that I'm taking far more pictues now: On one hand there's the instant gratification, on the other the zero cost of mistakes.
One thing I had to re-learn is that the eye's range of brightness is one heckuva lot wider than that of any photo sensor. At the same time, I've been favorably impressed with the performance of even cheap cameras at low light levels. However, there's a problem. Most cameras auto-expose for the brightest part of the image. If the brightest point is something like a headlight (as in Brendan's shot above), everything else in the image will be shifted toward black. But there's still information there, and by adjusting the "response curve" you can pull it up out of the mud and make it visible.
The magic tool you're looking for is "Adjust Color Curves," which you'll find in the GIMP's "Tools" menu:
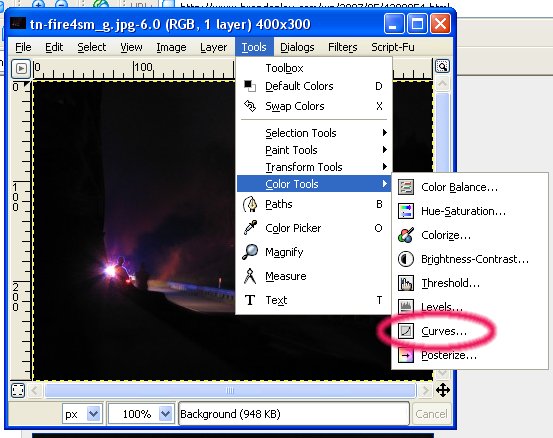
On opening the dialog, you see a graph like the one below. The horizontal axis represents input levels, the vertical axis represents output levels, and the gray area is a histogram that represents how much of the photo's information is at a particular brightness. Initially there's a black line that runs diagonally from lower-left to upper-right. That plots the "response;" when you start it's linear, but you can change that.
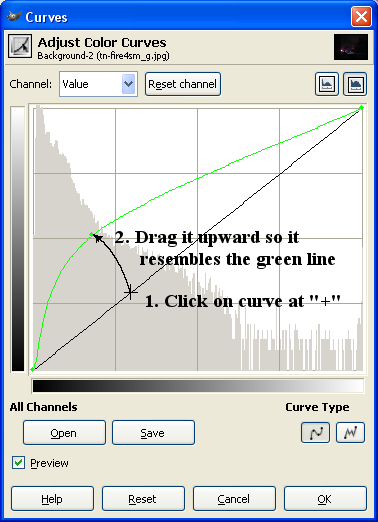
This histogram is the one for the original photo above. Note that most of the information lies in the "darker" left-hand half. To make that visible, I adjusted the curve by first clicking on it (which creates a handle to grab the curve), and then dragging it upward, until it looked like the one shown in green. The shape is automatic, with the line behaving like a stiff rubber band. The result is that the output image "gets lighter, faster," which lets you see all that information that was hiding in the blackness. If you have "preview" checked you will see the changes as you make them-- pretty cool! When you're satisfied, click "OK." (BTW, the curve doesn't change color when you drag it. I've recolored it to make the change more visible.)
There's a lot more that you can do with the curve tool: You can use multiple handles, and make the curve bend like a snake. You can give the curve sharp corners. By moving the endpoints, you can set which image values appear as full-white and full-black. You can even adjust the red, blue, and green response curves individually. (Oh, and you can quickly put everything back the way it was before you started playing: That's what the "Reset" button is for.) But most of the time a simple adjustment is enough, and that's what I've demonstrated here. And, of course, you can go too far. (Your eyes will tell you what's right.)
Comments are disabled.
Post is locked.
into this:
Last night Brendan Loy posted (via wireless connection, no less) some dramatic photos taken at an accident scene on I-40 between Nashville and Knoxville, Tennessee. His first picture was taken shortly after 9 p.m. (just after sunset). I've borrowed a couple for this demonstration, but go look at the others.
I'd never been much of a picture taker, and didn't get around to buying my first digital camera (a $100-special Polaroid) until a couple of years ago. Like many before me, I've discovered that I'm taking far more pictues now: On one hand there's the instant gratification, on the other the zero cost of mistakes.
One thing I had to re-learn is that the eye's range of brightness is one heckuva lot wider than that of any photo sensor. At the same time, I've been favorably impressed with the performance of even cheap cameras at low light levels. However, there's a problem. Most cameras auto-expose for the brightest part of the image. If the brightest point is something like a headlight (as in Brendan's shot above), everything else in the image will be shifted toward black. But there's still information there, and by adjusting the "response curve" you can pull it up out of the mud and make it visible.
The magic tool you're looking for is "Adjust Color Curves," which you'll find in the GIMP's "Tools" menu:
On opening the dialog, you see a graph like the one below. The horizontal axis represents input levels, the vertical axis represents output levels, and the gray area is a histogram that represents how much of the photo's information is at a particular brightness. Initially there's a black line that runs diagonally from lower-left to upper-right. That plots the "response;" when you start it's linear, but you can change that.
This histogram is the one for the original photo above. Note that most of the information lies in the "darker" left-hand half. To make that visible, I adjusted the curve by first clicking on it (which creates a handle to grab the curve), and then dragging it upward, until it looked like the one shown in green. The shape is automatic, with the line behaving like a stiff rubber band. The result is that the output image "gets lighter, faster," which lets you see all that information that was hiding in the blackness. If you have "preview" checked you will see the changes as you make them-- pretty cool! When you're satisfied, click "OK." (BTW, the curve doesn't change color when you drag it. I've recolored it to make the change more visible.)
There's a lot more that you can do with the curve tool: You can use multiple handles, and make the curve bend like a snake. You can give the curve sharp corners. By moving the endpoints, you can set which image values appear as full-white and full-black. You can even adjust the red, blue, and green response curves individually. (Oh, and you can quickly put everything back the way it was before you started playing: That's what the "Reset" button is for.) But most of the time a simple adjustment is enough, and that's what I've demonstrated here. And, of course, you can go too far. (Your eyes will tell you what's right.)
In
fact, I've found this adjustment so quick and easy to do that I'll
sometimes do it with web images (it works with anything: Webcams,
graphics, you name it). Just right click Copy Image, start GIMP, and
then "Acquire Image->From Clipboard."
And did I mention it's free? So what are you waiting for? GIMP for Windows.
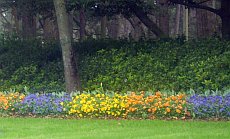
One more example:
after (note the plants on the left, and the radio tower on the right):
And did I mention it's free? So what are you waiting for? GIMP for Windows.
One more example:
after (note the plants on the left, and the radio tower on the right):
Posted by: Old Grouch in
Beta
at
16:18:01 GMT
| No Comments
| Add Comment
Post contains 653 words, total size 5 kb.
65kb generated in CPU 0.5069, elapsed 0.541 seconds.
51 queries taking 0.4038 seconds, 111 records returned.
Powered by Minx 1.1.6c-pink.
51 queries taking 0.4038 seconds, 111 records returned.
Powered by Minx 1.1.6c-pink.


